daisyUI概述
daisyUI是一个可定制的TailwindCSS的组件库,目前(发文日期)在GitHub中已经有12.8k的star数量。
它与现在常用的ElementUI或者AntDesign不同,它提供了一些类名,类似于Bootstrap,想要拿来即用的组件需要自己进行封装。
daisyUI官网中介绍了daisyUI的5个特点:
-
Tailwind CSS 的插件
-
快速开发
-
更纯净的 HTML
-
深度自定义、可定制主题
-
纯净 CSS、支持任意框架
丰富的资源
daisyUI内置了29款主题,开发出的网站可以直接使用这些主题
除了这内置的29款主题,还支持自定义,可以参考。
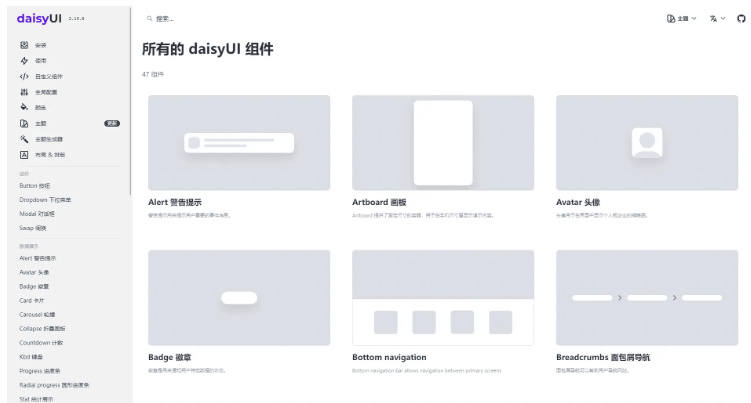
daisyUI目前一共内置了47个组件,如下图:

对比TailwindCSS
daisyUI虽然是TailwindCSS插件,但是却有一点“反”TailwindCSS的意思,如果我们想要实现一个按钮,使用TailwindCSS的写法如下:
<a class="inline-block px-4 py-3 text-sm font-semibold text-center text-white uppercase transition duration-200 ease-in-out bg-indigo-600 rounded-md cursor-pointer hover:bg-indigo-700">Button</a>
而使用daisyUI的代码如下:
<a class="btn btn-primary">Button</a>
上面的代码实现了了一个按钮,可以明显看后者比前者更节省代码。
顽强的适用性
daisy是一个纯净的CSS组件,它几乎适用于所有的前端开发场景,我在官网截了个图
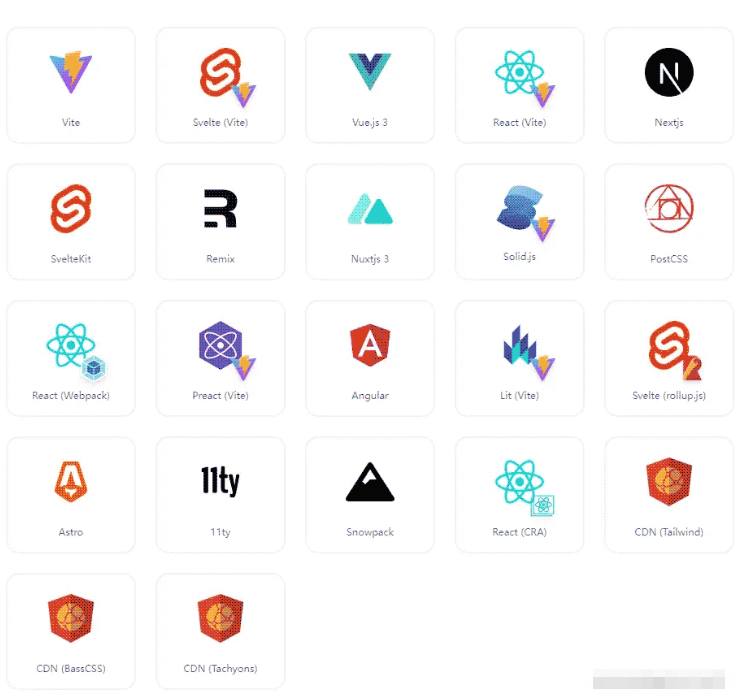
可以看到目前已经支持全部的前端开发场景。
快速上手
现在我们使用Vue3+TS+Vite3创建要给项目,并在项目中应用daisyUI,首先就是通过Vite创建一个Vu3+TS的项目,创建过程如下:
这里我使用pnpm作为包管理工具,项目安装过程如下:
pnpm create vite# project name -> daisyui-demo# select a framework -> vue# select a variant -> vue+tscd daisyui-demopnpm installcode . # 使用VScode打开项目
安装完成之后我们在项目中安装一下TailwindCSS,daisyUI的使用需要TailwindCSS;过程如下:
pnpm install -D tailwindcss postcss au较好refixer# 生成配置文件pnpm tailwindcss init -p
修改一下tailwind.config配置文件,修改成下面这样的。
// tailwind.config.cjs/** @type {import('tailwindcss').Config} */module.exports = { content: ['./index.html', './src/**/*.{vue,js,ts,jsx,tsx}'], theme: { extend: {}, }, plugins: [],}
然后创建一个css文件,引入TailwindCSS的内容
// src/index.css@tailwind base;@tailwind components;@tailwind utilities;
然后在main.ts中引入这个css:
import { createApp } from 'vue'import './style.css'// 引入前面添加的cssimport './index.css'import App from './App.vue'createApp(App).mount('#app')
到这为止我们就安装好了我们TailwindCSS,现在来安装下daisyUI,过程如下:
pnpm i daisyui
然后在修改一下tailwind.config配置文件,修改成下面这样的。
/** @type {import('tailwindcss').Config} */module.exports = { content: ['./index.html', './src/**/*.{vue,js,ts,jsx,tsx}'], theme: { extend: {}, }, plugins: [require('daisyui')],}
就是把刚安装的daisyUI引入一下呀
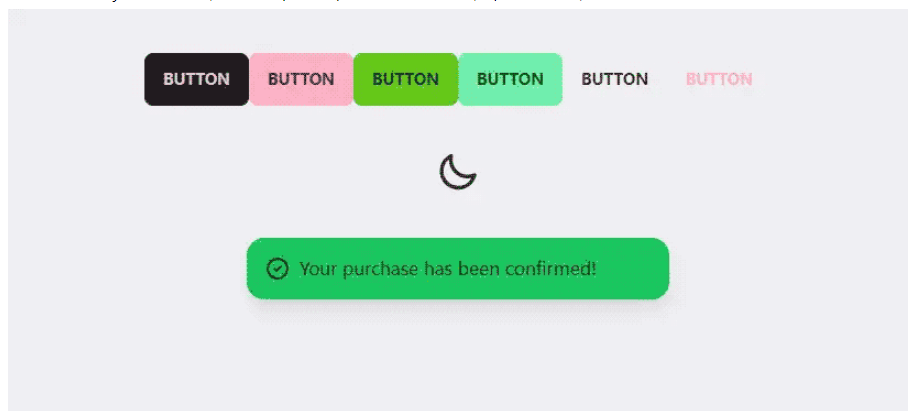
现在这个就写完了,我们去App.vue中简单的使用一下这个UI组件。实例代码如下:
<script setup lang="ts">const handleChangeTheme = () => { const html = document.getElementsByTagName('html')[0] const darkTheme = html.dataset.theme if (darkTheme === 'dark') { html.dataset.theme = 'light' } else { html.dataset.theme = 'dark' }}</script><template> <div class="button-container flex justify-center my-10"> <button class="btn">Button</button> <button class="btn btn-primary">Button</button> <button class="btn btn-secondary">Button</button> <button class="btn btn-accent">Button</button> <button class="btn btn-ghost">Button</button> <button class="btn btn-link">Button</button> </div> <div class="flex justify-center my-10"> <label class="swap swap-rotate"> <!-- this hidden checkbox controls the state --> <input type="checkbox" @click="handleChangeTheme" /> <!-- sun icon --> <svg class="swap-on fill-current w-10 h-10" xmlns="http://www.w3.org/2000/svg" viewBox="0 0 24 24" > <path d="M5.64,17l-.71.71a1,1,0,0,0,0,1.41,1,1,0,0,0,1.41,0l.71-.71A1,1,0,0,0,5.64,17ZM5,12a1,1,0,0,0-1-1H3a1,1,0,0,0,0,2H4A1,1,0,0,0,5,12Zm7-7a1,1,0,0,0,1-1V3a1,1,0,0,0-2,0V4A1,1,0,0,0,12,5ZM5.64,7.05a1,1,0,0,0,.7.29,1,1,0,0,0,.71-.29,1,1,0,0,0,0-1.41l-.71-.71A1,1,0,0,0,4.93,6.34Zm12,.29a1,1,0,0,0,.7-.29l.71-.71a1,1,0,1,0-1.41-1.41L17,5.64a1,1,0,0,0,0,1.41A1,1,0,0,0,17.66,7.34ZM21,11H20a1,1,0,0,0,0,2h2a1,1,0,0,0,0-2Zm-9,8a1,1,0,0,0-1,1v1a1,1,0,0,0,2,0V20A1,1,0,0,0,12,19ZM18.36,17A1,1,0,0,0,17,18.36l.71.71a1,1,0,0,0,1.41,0,1,1,0,0,0,0-1.41ZM12,6.5A5.5,5.5,0,1,0,17.5,12,5.51,5.51,0,0,0,12,6.5Zm0,9A3.5,3.5,0,1,1,15.5,12,3.5,3.5,0,0,1,12,15.5Z" /> </svg> <!-- moon icon --> <svg class="swap-off fill-current w-10 h-10" xmlns="http://www.w3.org/2000/svg" viewBox="0 0 24 24" > <path d="M21.64,13a1,1,0,0,0-1.05-.14,8.05,8.05,0,0,1-3.37.73A8.15,8.15,0,0,1,9.08,5.49a8.59,8.59,0,0,1,.25-2A1,1,0,0,0,8,2.36,10.14,10.14,0,1,0,22,14.05,1,1,0,0,0,21.64,13Zm-9.5,6.69A8.14,8.14,0,0,1,7.08,5.22v.27A10.15,10.15,0,0,0,17.22,15.63a9.79,9.79,0,0,0,2.1-.22A8.11,8.11,0,0,1,12.14,19.73Z" /> </svg> </label> </div> <div class="flex justify-center"> <div class="alert alert-success shadow-lg w-96"> <div> <svg xmlns="http://www.w3.org/2000/svg" class="stroke-current flex-shrink-0 h-6 w-6" fill="none" viewBox="0 0 24 24" > <path stroke-linecap="round" stroke-linejoin="round" stroke-width="2" d="M9 12l2 2 4-4m6 2a9 9 0 11-18 0 9 9 0 0118 0z" /> </svg> <span>Your purchase has been confirmed!</span> </div> </div> </div></template><style scoped></style>
自定义主题
daisyUI有一个好玩的特性就是允许自定义主题,而且非常简单,只需要在tailwind.config.js中添加一个daisyui的配置项,增加一个themes的数组即可,实例代码如下:
/** @type {import('tailwindcss').Config} */module.exports = { content: ['./index.html', './src/**/*.{vue,js,ts,jsx,tsx}'], theme: { extend: {}, }, plugins: [require('daisyui')], daisyui: { themes: [ { // key为自定义主题名称 'ywz-theme': { primary: '#fcaec1', secondary: '#64c619', accent: '#6fedac', neutral: '#281E29', info: '#83C2E2', success: '#1BC55F', warning: '#F0AA28', error: '#E24B4B', 'base-100': '#EFEEF2', '--rounded-box': '1rem', // border radius rounded-box utility class, used in card and other large boxes '--rounded-btn': '0.5rem', // border radius rounded-btn utility class, used in buttons and similar element '--rounded-badge': '1.9rem', // border radius rounded-badge utility class, used in badges and similar '--animation-btn': '0.25s', // duration of animation when you click on button '--animation-input': '0.2s', // duration of animation for inputs like checkbox, toggle, radio, etc '--btn-text-case': 'uppercase', // set default text transform for buttons '--btn-focus-scale': '0.95', // scale transform of button when you focus on it '--border-btn': '1px', // border width of buttons '--tab-border': '1px', // border width of tabs '--tab-radius': '0.5rem', // border radius of tabs }, }, ], },}
可以配置daisyUI提供的主题生成器,可以轻松实现自定义主题,自定义主题实用如下:
封装一个button组件
daisyUI是基于原始的CSS实现的,基本上所有的组件只有样式没有功能,现在就简单的封装一个button组件再来学习一下daisyUI。
首先定义一下目录结构,如下所示:
monorepo-demo├── src│ ├── components│ │ ├── button│ │ │ ├── index.ts│ │ │ ├── src│ │ │ │ └── YwzButton.vue├── pnpm-lock.yaml└── package.json
其中src/components/button/index.ts的内容如下:
import YwzButton from './src/YwzButton.vue'export { YwzButton }
这里就执行了导入导出操作
主要代码如下:
<script setup lang="ts">import { computed } from 'vue'interface Props { disabled?: boolean type?:'primary' | 'secondary' | 'accent' | 'info' | 'success' | 'warning' | 'error' | 'ghost' | 'link' outline?: boolean size?: 'lg' | 'md' | 'sm' | 'sx'}const props = defineProps<Props>()const classComputed = computed(() => { const classList = [] props.disabled && classList.push('btn-disabled') props.type && classList.push('btn-' + props.type) props.outline && classList.push('btn-outline') props.size && classList.push('btn-' + props.size) return classList})</script><template> <button class="btn" :class="classComputed"> <!-- 默认插槽 --> <slot></slot> </button></template><style scoped></style>
使用这个组件也很简单,代码如下:
<script setup lang="ts">import YwzButton from './components/button/src/YwzButton.vue'</script><template> <div class="button-container flex justify-center my-10"> <YwzButton type="error" outline size="lg">按钮</YwzButton> </div></template><style scoped></style>
到此,关于“daisyUI怎么解决TailwindCSS堆砌class问题”的学习就结束了,希望能够解决大家的疑惑。理论与实践的搭配能更好的帮助大家学习,快去试试吧!若想继续学习更多相关知识,请继续关注亿速云网站,小编会继续努力为大家带来更多实用的文章!
文章包含AI辅助创作:daisyUI怎么解决TailwindCSS堆砌class问题,发布者:亿速云,转载请注明出处:https://worktile.com/kb/p/21432
 微信扫一扫
微信扫一扫  支付宝扫一扫